
Bearing Manufacturer & Supplier
Specialize in ball bearings, roller bearings, thrust bearings, thin section bearings etc.
Follow me on:


Bearing Installation And Removal Guide
In order to ensure the stable operation of the bearing system and achieve the expected service life, the bearings need to be installed and disassembled correctly. If installed incorrectly, the bearings will be damaged prematurely, which may affect the machine’s use experience, increase noise and heat, or cause machine shutdown, property damage, and health hazards to mechanics. This article introduces you to the guide for bearing installation and removal.
Bearing Disassembly
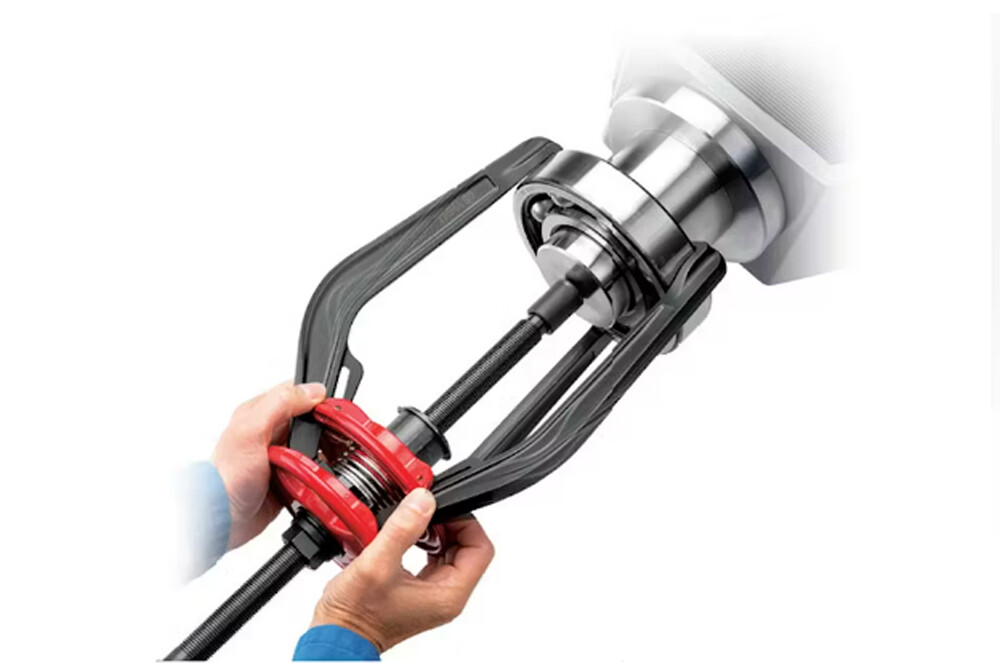
When replacing bearings, the first step is to remove the failed bearing, and your best option is to use a puller and press. Using a bearing puller to safely pull the bearing out of the outer race minimizes damage to the shaft and housing and saves time. In addition to the puller, a separator can also be used to disassemble the bearing. The separator is designed with two plates placed behind the bearing. The bearing is pulled out by the force on the plate. If a heavy bearing needs to be disassembled, the separator can use hydraulic pressure. Auxiliary cylinder supplies power. It is not recommended to use the removed bearing again, but it is necessary to carefully inspect the removed bearing to determine the cause of the bearing failure and summarize experience to protect the bearing when it is used in the future. Some bearing damage is invisible to the naked eye and may require advanced analysis tools to determine the cause of the failure.

The removed bearings can be resent to the manufacturer, who will clean, inspect, measure, and re-grind the bearings. If they meet the conditions for reuse after inspection, they can be reused. When dealing with some large and expensive bearings, You can save a lot of money by doing this.
Bearing installation
When you need to install a new bearing, you need to handle it with special care. The first thing is to ensure that there is a clean, dry, and vibration-free storage space. Do not open the bearing package before installing the bearing. Unless the instructions require it, you should not wipe or clean it before installation. Factory prefilled with oil or grease. Before starting installation, you need to ensure that the bearing housing and shaft are clean and free of burrs. You can use emery to polish, but the particles produced by emery paper may also contaminate the bearing. It is recommended to consider using an industrial transparent polishing pad to clean the shaft and housing, and then use light engine oil. To remove moisture, the bearings must be kept clean throughout the process. When installing you need to make sure you also measure the bore and shaft to make sure they are within the recommended tolerances of the bearing and machine. It is recommended to use tools such as vernier calipers or micrometers for measurement. The amount of force you should use when installing the bearing will depend on the type and degree of fit. In many applications, such as motor shafts, the inner ring requires an interference fit, while the outer ring requires a clearance fit.

If the bearing diameter is less than 50mm and its inner ring is installed with a slight interference fit, consider using a bearing press. The driving tool consists of a solid hammer, polymer impact ring and metal tube. The tube driver is multi-purpose and can be used with Oil seals, oil seals and bushings are used together. You need to make sure you are using a safe press that is securely fastened to a sturdy workbench. A stand should be used with a long handle to provide leverage. Press the handle and use an anvil to apply pressure on the handle. Support the machine slowly.
As shown in Figure a, place the installation tool on the inner ring, and then use a press to slowly press the bearing on the shaft until the side of the inner ring touches the shaft shoulder. Do not place the installation tool on the outer ring for press fit, otherwise the bearing may be damaged. Before installation, it is recommended to apply oil on the surface of the installed shaft to facilitate smooth insertion. The installation method using a hammer is only suitable for small ball bearings with a minimum tight fit and where a press cannot be used. This method is not suitable in the case of tight interference fits or medium and large bearings.
Any time you use a hammer, you must place the installation tool on the inner ring. When both the inner and outer rings of a non-separable bearing (such as a deep groove ball bearing) require a tight fit, place the installation tool on both rings as shown in the figure. Install both rings at the same time using screws or bolts. Hydraulic Press. Because the outer rings of self-aligning ball bearings can deflect, they should always be installed using the installation tool shown in the illustration.

For separate bearings, such as cylindrical roller bearings and tapered roller bearings, the inner and outer rings can be installed separately. Assembly of the inner and outer rings that were previously installed separately should be done with care to properly align the inner and outer rings. Careless or forced assembly may result in scratches on the rolling contact surfaces.


Thermal expansion and contraction
In order to easily install the bearing, you can use the principle of thermal expansion and contraction to increase or decrease the temperature of the bearing, shell or shaft, so as to separate the bearing from the shaft and shell, making it easier to remove the bearing. You must ensure that the shell and shaft are clean and free of burrs. And it is necessary to measure correctly to ensure that the dimensions of the housing or shaft are within the recommended range. If they are outside the recommended range, they need to be replaced. Induction heaters can be used to heat bearings. Induction heaters are safer, cleaner, and efficient than other methods. Induction heaters generate a strong magnetic field, induce eddy currents in the metal shaft, and connect secondary coils to deliver low AC. current, and the bearing acts as a short circuit, the effect is that the ferrules closer to the rod heat up faster, thus requiring the bearing to be heated several times.

Press-fitting large bearings requires a lot of force, so thermo-press fitting is widely used. Before installation, the bearings are first heated in oil to expand them. This method prevents excessive force on the bearings and allows them to be installed in a short time.
Things to note when hot loading are as follows:
Do not heat bearings above 120°C.
Place the bearing on wire mesh or hang it in the tank to prevent the bearing from directly contacting the bottom of the tank.
Heat the bearings to 20 to 30°C above the minimum temperature.
Since the inner ring cools slightly during installation, it is installed without disturbing the required temperature.
After installation, the bearing will undergo axial shrinkage and radial shrinkage.
During cooling, positioning methods should be used to press the bearing tightly against the shoulder to avoid gaps between the bearing and the shoulder.
Regardless of the method used, force should be applied evenly to the bearing. To do this, use a fixture and install the bearing gently. Do not use a clamp on the outer ring to press fit the inner ring or vice versa. When both the inner and outer rings of a non-separable bearing require interference, the two clamps shown on the right should be used to gently press the bearing because the rolling elements are easily damaged.